XamDataGrid–Dynamically Create and Data Bind Columns with an Editor of your Choice
I recently had a good friend of mine send me an email asking how to dynamically generate columns based on a collection of objects with the XamDataGrid. This seems like a very common task that just about all applications will probably need to do. It’s definitely not an uncommon task.
I recently had a good friend of mine send me an email asking how to dynamically generate columns based on a collection of objects with the XamDataGrid. This seems like a very common task that just about all applications will probably need to do. It’s definitely not an uncommon task.
In this particular case, we need to flatten out a collection of objects to be represented as columns in the grid. For example; you may have an object that has an n-level number of properties or attributes that aren’t known until runtime, but you want to edit the object in a single row in a grid. You don’t want to add a bunch of properties on your object like Prop1, Prop2, Prop3, etc.., just so you can bind it to your grid. You have no idea how many there will be. You want to dynamically add columns to your grid and bind those columns to the correct object in the child collection at run time.
In this scenario I am building a staffing application and I have a “StaffMember” object that has a collection of “Period” objects as a child property. My objects look something like this:
public class StaffMember
{
    public String Department { get; set; }
    public String Name { get; set; }
    public IList<Period> Periods { get; set; }

    public StaffMember()
    {
        this.Periods = new List<Period>();
    }
}

public class Period
{
    public string Title { get; set; }
    public int Hours { get; set; }
}
These are just simple POCOs which do not currently implement INotifyPropertyChanged. For this demo app, I do not need property notifications. In a production application, you will most likely need to implement the INotifyPropertyChanged interface for change notifications. Next we need a ViewModel.
public class StaffMemberViewModel : INotifyPropertyChanged
{
    ObservableCollection<StaffMember> _staffMembers;
    public ObservableCollection<StaffMember> StaffMembers
    {
        get { return _staffMembers; }
        set
        {
            _staffMembers = value;
            RaisePropertyChanged("StaffMembers");
        }
    }

    public StaffMemberViewModel()
    {
        PopulateStaffMembers();
    }

    void PopulateStaffMembers()
    {
        var list = new ObservableCollection<StaffMember>();
        var rand = new Random();

        for (Int32 i = 1; i < 4; i++)
        {
            var member = new StaffMember { Name = String.Format("Name {0}", i), Department = String.Format("Department {0}", i) };
            for (int j = 1; j < 5; j++)
                member.Periods.Add(new Period { Title = String.Format("Period {0}", j), Hours = rand.Next(0, 160) });
            list.Add(member);
        }

        StaffMembers = list;
    }

    public event PropertyChangedEventHandler PropertyChanged;
    void RaisePropertyChanged(String propertyName)
    {
        var handler = this.PropertyChanged;
        if (handler != null)
            handler(this, new PropertyChangedEventArgs(propertyName));
    }
}
This ViewModel does implement the INotifyPropertyChanged interface, as should all ViewModels. As you can see we have a single property that exposes a collection of StaffMembers. We also have a method that generates some dummy data for us. The next thing we need is a View.
<Window x:Class="XamDataGridDynamicColumns.MainWindow"
        xmlns="http://schemas.microsoft.com/winfx/2006/xaml/presentation"
        xmlns:x="http://schemas.microsoft.com/winfx/2006/xaml"
        xmlns:igWPF="http://schemas.infragistics.com/xaml/wpf"
        xmlns:local="clr-namespace:XamDataGridDynamicColumns"
        Title="MainWindow" Height="350" Width="525">

    <Window.DataContext>
        <local:StaffMemberViewModel />
    </Window.DataContext>

    <Grid>
        <igWPF:XamDataGrid DataSource="{Binding Path=StaffMembers}"
                           FieldLayoutInitialized="xamDataGrid_FieldLayoutInitialized">
            <igWPF:XamDataGrid.FieldLayoutSettings>
                <igWPF:FieldLayoutSettings AutoGenerateFields="False"/>
            </igWPF:XamDataGrid.FieldLayoutSettings>
            <igWPF:XamDataGrid.FieldLayouts>
                <igWPF:FieldLayout>
                    <igWPF:Field Name="Name"/>
                    <igWPF:Field Name="Department"/>
                </igWPF:FieldLayout>
            </igWPF:XamDataGrid.FieldLayouts>
        </igWPF:XamDataGrid>
    </Grid>
</Window>
First notice that we have defined two namespaces in our View. One is for our local objects, and the other is for the Infragistics controls we will be using. Set the DataContext of the View to an instance of our StaffMemberViewModel. You can do this however you want. I just happened to do it in XAML. Now we need to declare a XamDataGrid and data bind it to our collection of StaffMembers in our ViewModel. Now the idea is that we know that our StaffMember has a Name and Department that will always be available. These are not dynamic columns so we can go ahead and create our view by declaring them in our FieldLayout. e want to make sure we set AutoGenerateField = false, because we will be in charge of what columns to create.
So how do we start generating columns? Well first add an event handler to the XamDataGrid.FieldLayoutInitialized event. This is where all the magic will happen to create, data bind, choose an editor, and add the columns will occur. I added a little property to for our ViewModel to give me access to any data that I may need.
public StaffMemberViewModel ViewModel
{
    get { return this.DataContext as StaffMemberViewModel; }
}

private void xamDataGrid_FieldLayoutInitialized(object sender, Infragistics.Windows.DataPresenter.Events.FieldLayoutInitializedEventArgs e)
{

}
The ViewModel property simply gives me the DataContext of the View in the form of our StaffMemberViewModel (I’ll be using this to cheat in a minute). We need to create our columns based off the number of Periods in the Periods Collection of the StaffMember. Remember, we don’t know how many Periods we will have until runtime, to we need to get this information first. Here is where I am going to cheat for demo purposes.
private void xamDataGrid_FieldLayoutInitialized(object sender, Infragistics.Windows.DataPresenter.Events.FieldLayoutInitializedEventArgs e)
{
    //a cheat to get the number of columns to create.
    var staffMember = this.ViewModel.StaffMembers.First();

    for (Int32 i = 0; i < staffMember.Periods.Count; i++)
    {
        var field = new UnboundField
        {
            Name = staffMember.Periods[i].Title,
            BindingMode = BindingMode.TwoWay,
            BindingPath = new PropertyPath(String.Format("Periods[{0}].Hours", i))
        };

        e.FieldLayout.Fields.Add(field);
    }
}
In this demo, I am using the first StaffMember in the collection to determine the number of columns to create. Now of course, in the real world, you would not want to use the first index of the child collection to figure out how many columns to build. I would recommend some kind of definition object that will define what columns and how many columns to build. Next, we create a loop with the correct number of interations to make and create a new UnboundField. We want to set three important properties. The first one being the Name. This is going to give us our column header. Next is the BindingMode. We want our data bindings to be TwoWay. Lastly we create a BindingPath. Notice how I am creating a binding path that uses an indexer ([ ]). This allows us to create bindings for the objects at specific indexes of the collection we are flattening out. Finally, all we need to do is add the newly created field to our FieldLayout. Run the application and this is what you get.

Pretty nice. We have successfully flattened out our object graph, and created the proper data bindings for each cell to each property of the underlying object.
Choosing Your Editor
Now I know what you are thinking. But Brian, the default editor is a TextBlock. What if I want to use a different editor like the XamNumericEditor. Well, luckily for you that is sooooo simple to do. We just need to add some code and a little bit of XAML.
private void xamDataGrid_FieldLayoutInitialized(object sender, Infragistics.Windows.DataPresenter.Events.FieldLayoutInitializedEventArgs e)
{
    //a cheat to get the number of columns to create.
    var staffMember = this.ViewModel.StaffMembers.First();

    for (Int32 i = 0; i < staffMember.Periods.Count; i++)
    {
        var field = new UnboundField
        {
            Name = staffMember.Periods[i].Title,
            BindingMode = BindingMode.TwoWay,
            BindingPath = new PropertyPath(String.Format("Periods[{0}].Hours", i))
        };

        field.Settings.EditAsType = typeof(Int32);
        field.Settings.EditorStyle = (Style)Resources["HoursFieldStyle"];

        e.FieldLayout.Fields.Add(field);
    }
}
We added two line of code to our event handler. By setting the Field.Settings.EditAsType property, we are instructing the editor we are using how to handle the data type. Since our Hours property is of type Int, we set the property accordingly. Now, that’s not going to give us the XamNumericEditor automatically. For that, we need to provide an EditorStyle. So we add a line of code telling the Field.Settings.EditorStyle property to get its value from a resource we are about to create called “HoursFieldStyle”.
<Window.Resources>
    <Style x:Key="HoursFieldStyle" TargetType="{x:Type igWPF:XamNumericEditor}">
        <Setter Property="Mask" Value="###" />
    </Style>
</Window.Resources>
Open up our XAML and define a style within the Window.Resources property of our View. What we are doing here is specifying that we will be using the XamNumericEditor and then setting the Mask property on that editor to 3 digits. Now, keep in mind that our random data is less than 3 digits, but this is just being used as an example. Run the application and lets see what we get.

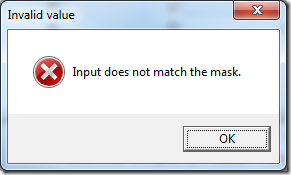
We now are using the XamNumericEditor with a Mask of ###. What happens if we try to enter a value that doesn’t match the ### mask we defined?

That’s right! Our editor functions like it should warning you that the new value does not match the mask required for valid input. Pretty cool, right!? And it’s oh-so-easy.
Well, How About a ComboBox?
Okay Brian, you showed us the simple stuff, but what about something more complicated? I want to use a XamComboEditor and have it populated with values to choose form for each cell. Are you trying to challenge me? Bring. It. On.
Alright, first thing is first. We need a data source for our XamComboEditor. There are a few approaches to this, so I will just pick one. I need an object that will represent that values ot select from and a class to use as a data source. It could event be a separate ViewModel or within the same ViewModel we currently have. I will use a separate one. Here is the classes representing my data source for the XamComboEditor:
public class HoursDataSource
{
    public ObservableCollection<DataItem> Hours { get; set; }

    public HoursDataSource()
    {
        PopulateHours();
    }

    private void PopulateHours()
    {
        var list = new ObservableCollection<DataItem>();

        for (int i = 1; i < 160; i++)
        {
            list.Add(new DataItem() { Name = i.ToString(), Value = i });
        }

        Hours = list;
    }
}

public class DataItem
{
    public string Name { get; set; }
    public int Value { get; set; }
}
Pretty simple. There’s not much to it. Now we need to add some code to our XAML.
<Window.Resources>
    <local:HoursDataSource x:Key="hoursDataSource" />
    <igWPF:ComboBoxItemsProvider x:Key="hoursProvider" ItemsSource="{Binding Hours, Source={StaticResource hoursDataSource}}" DisplayMemberPath="Name" ValuePath="Value" />
    <Style x:Key="HoursFieldStyle" TargetType="{x:Type igWPF:XamComboEditor}">
        <Setter Property="ItemsProvider" Value="{StaticResource hoursProvider}" />
    </Style>
    <!--<Style x:Key="HoursFieldStyle" TargetType="{x:Type igWPF:XamNumericEditor}">
        <Setter Property="Mask" Value="###" />
    </Style>-->
</Window.Resources>
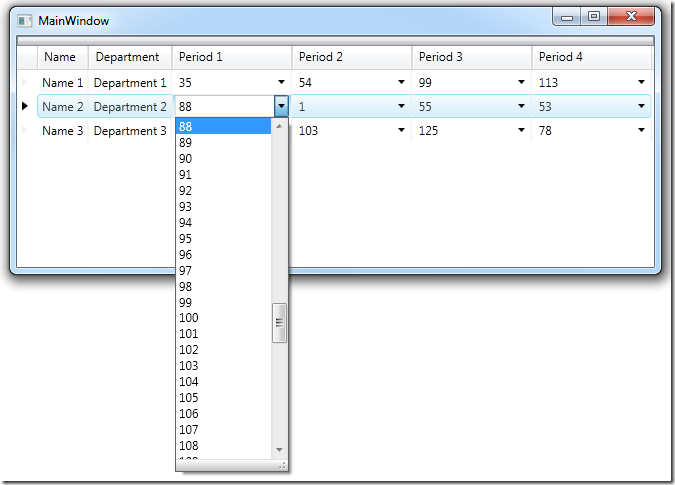
We start by commenting out the first Style we created. Next we need to add an instance of our HoursDataSource object. Next create a ComboBoxItemsProvider. Data bind the ItemsSource to the Hours property that exists in our HoursDataSource instance. Don’t forget to set the DsiplayMemberPath=Name and the ValuePath=Value. Then replace the style we had earlier with a new one that sets the TargetType os a XamComboEditor. Define a Setter that sets the ItemsProvider property to our ComboBoxItemsProvider resource we just created. Run the app, and let’s see what happens.

Of course, you can always make this more functional by including logic to determine what editor to use for what column, or what type the value should be edited as for different columns.
Please feel free to download the source code. If you have any questions you can contact me through my blog at http://brianlagunas.com, on Twitter (@BrianLagunas), or just leave a comment below.