Creating Barcodes With or Without Human-Readable Text With the Xambarcode
Parallel lines with varying width and spacing – they are virtually everywhere. Barcodes have a rather long history of becoming a standard for assigning data to an optical representation and it allowed for identifying a broad range of goods in stores, shipping containers and countless other items, which in turn streamlined multiple industry processes.
Parallel lines with varying width and spacing – they are virtually everywhere. Barcodes have a rather long history of becoming a standard for assigning data to an optical representation and it allowed for identifying a broad range of goods in stores, shipping containers and countless other items, which in turn streamlined multiple industry processes.
Since barcodes are so popular and useful it’s no surprise you might need to represent data in such manner in an application and Infragistics’ XAML packages (NetAdvantage for WPF, Silverlight and Windows Phone) are equipped to help you with just that. The XamBarcode is just the base class really and the common name for a family of controls capable of displaying data as a graphic with lines and shapes based on various standard. There are quite a few symbologies, so if you are interested you can read extensively about them in our documentation (that’s the Silverlight help page but the other products contain the same information too). Each of them strives to save up as much work for the developer as possible – you don’t need to know the rules to create them, and in most cases you can just provide the data you want encoded and enjoy. Also each control handles just one symbology which also makes adding barcodes in XAML that much simpler (and it really is simple, you’ll see below).
Now there are a few special codes (like QR code) that have extra options because their non-linear structure, but most linear types like the Code 128 or Ean/Upc codes have their data displayed just below them. With 12.1 there’s a small update that allows you to hide that along with a CTP imaging library to make you ‘bar-coding’ life easier.
Human-Readable Text
That part is called very appropriately the human-readable text as the barcode is machine-readable and some standards provides us with friendly image that still carries meaning without a barcode reader.

While this is all very nice, there might be cases where you need just the barcode, cases where it is not required or reasonable to have that text. A new property was recently added to the controls that have such in order to be able to control if the data should be visible or waste your ink. A simple ‘ShowText’ property is now available for the following codes:
- Code 39
- Code 128
- Ean/Upc
- Interleaved 2 Of 5
- GS1 DataBar
- Royal Mail
It’s a small change, but it may very well prove impactful, so let’s see how to use it!
Adding Barcodes
Start by adding the required references – (naming is identical across the platforms) Infragistics<platform>.v12.1.dll, Infragistics<platform>.DataVisualization.v12.1.dll, Infragistics<platform>.Controls.Barcodes.v12.1.dll. Setting up the XamBarcode controls, providing data and controlling the human-readable text can be easily done solely in XAML via binding. For example let’s have our user input the data in a field and give him some sort of a switch (toggle button, radio buttons, checkbox, etc.) to bind the “ShowText”:
<TextBox x:Name="userInput"/>
<ToggleButton x:Name="textToggle" IsChecked="True">show/hide text</ToggleButton>
And then add some Xam<code>Barcode controls to your page:
xmlns:ig="http://schemas.infragistics.com/xaml"

<ig:XamCode39Barcode Data="{Binding Text, ElementName=userInput}" ShowText="{Binding IsChecked, ElementName=textToggle}" />
<ig:XamCode128Barcode Data="{Binding Text, ElementName=userInput}" ShowText="{Binding IsChecked, ElementName=textToggle}" Grid.Column="1"/>
<ig:XamEanUpcBarcode Data="{Binding Text, ElementName=userInput}" ShowText="{Binding IsChecked, ElementName=textToggle}" Grid.Column="2"/>
<ig:XamInterleaved2Of5Barcode Data="{Binding Text, ElementName=userInput}" ShowText="{Binding IsChecked, ElementName=textToggle}" Grid.Row="1" />
<ig:XamGs1DataBarBarcode Data="{Binding Text, ElementName=userInput}" ShowText="{Binding IsChecked, ElementName=textToggle}" Grid.Row="1" Grid.Column="1"/>
<ig:XamRoyalMailBarcode Data="{Binding Text, ElementName=userInput}" ShowText="{Binding IsChecked, ElementName=textToggle}" Grid.Row="1" Grid.Column="2"/>
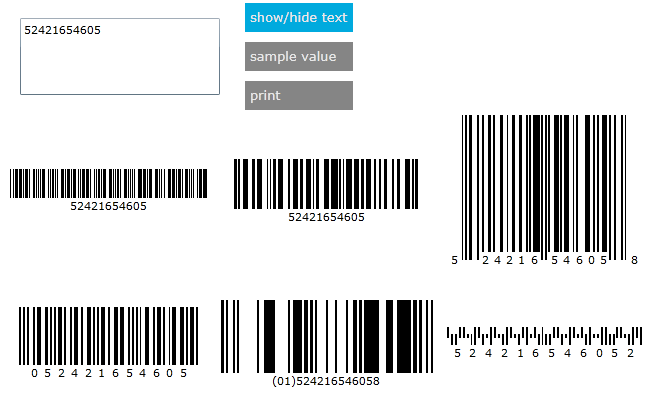
After some arrangement and styling the demo can looks like this:

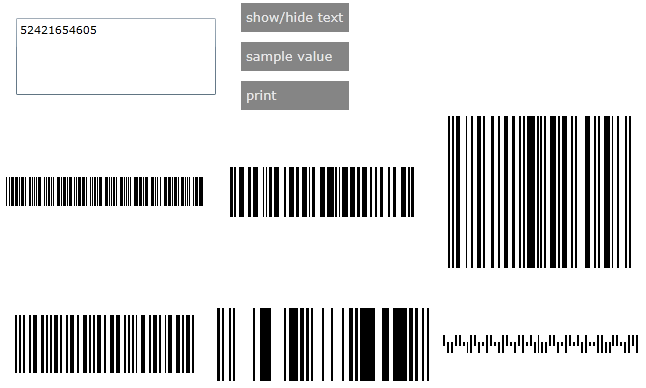
There are some additional buttons I’ve added and will comment on them below, but for now we are interested in the ‘show’hide’ toggle button that when unchecked will cause all barcodes to loose their text:

Making the Most of It
Besides letting the user control what happens with the text, you could set that in code as well and there are some interesting applications for that as well. What you can do is display barcodes to the user with their readable data and then hide it just before printing or the other way around! Here’s how that would look in a WPF application (note we have a whole bunch of barcodes so we just switch the toggle button to affect all of them, but the barcode controls can be used instead):
private void PrintButton_Click(object sender, RoutedEventArgs e)
 {
     //print document
     PrintDialog printDialog = new PrintDialog();
     if (printDialog.ShowDialog() == true)
     {
         //turn text off if it's visible
         if (this.textToggle.IsChecked == true)
         {
             this.textToggle.IsChecked = false;
             _changed = true;
         }
         //print
         printGrid.Measure(new Size(printDialog.PrintableAreaWidth, printDialog.PrintableAreaHeight));
         printGrid.Arrange(new Rect(10,10,printDialog.PrintableAreaWidth, printDialog.PrintableAreaHeight));
         printDialog.PrintVisual(printGrid, "Barcodes Docs");

         // set text back on if it was removed for printing
         if (_changed)
         {
             this.textToggle.IsChecked = true;
             _changed = false;
         }
     }
 }
Also the CTP feature I mentioned that is meant to help Silverlight applications encode images – you can use that too! Let the user save an image of the barcodes in the application with or without the text and you could also control the quality of the image:
using (Stream stream = saveDialog.OpenFile())
 {
     Infragistics.Imaging.JpegImageEncoder jpgEncoder = new Infragistics.Imaging.JpegImageEncoder();
     List<EncodingProperty> qualityList = new List<EncodingProperty>();
     qualityList.Add(new JpegQualityProperty() { Quality = 100 });
     jpgEncoder.Encode(bitmap, qualityList, stream);
 }
Conclusion
There’s no doubt barcodes are useful – they can be data-packed, they can streamline and organize processes and they are everywhere. Using the XAML Barcode controls you can integrate such popular functionality in your application with great ease. Now you have even more control to the visuals of the linear barcodes with human-readable text – you can show or hide it to properly present it to the user or for printing or saving to an image!
You can download the Demos shown above for Silverlight and WPF! Also you can see all the different types of codes in action visiting our Silverlight Online Samples! And you can download the WPF ones from the link above and find the Windows Phone samples in the Market.
Follow us on Twitter @Infragistics and join the competition on Facebook and don’t forget to vote for us in the Code Project’s Reader’s Choice Awards!