@Output 및 EventEmitter를 사용한 구성 요소 데이터 흐름 Angular
AngularJS와 달리 Angular 에는 양방향 데이터 바인딩이 없습니다. Angular 에는 양방향 데이터 바인딩이 없다고 말할 때, 그렇다고 해서 이를 달성할 수 없다는 의미는 아닙니다.
양방향 데이터 바인딩을 지원하지 않고는 최신 웹 프레임워크가 존재할 수 없습니다. Angular ngModel 지시문을 사용하여 이 기능을 제공합니다. 이를 사용하려면 FormsModule을 가져와야 하며 다음과 같은 다양한 방법으로 사용할 수 있습니다.
- ngModel
- [ngModel]
- [(ngModel)]
Angular에 AngularJS와 같은 양방향 데이터 바인딩이 없는 이유가 궁금할 수 있습니다. AngularJS는 한때 다이제스트 주기, 더티 검사 알고리즘 등을 사용하여 양방향 데이터 바인딩을 구현했으며 이러한 접근 방식에는 고유한 문제가 있었습니다. 이 기사에서는 AngularJS 양방향 데이터 바인딩의 문제에 중점을 두어 Angular에서 다르게 처리되는 이유를 이해할 것입니다.
Angular로 돌아가서 양방향 데이터 바인딩은 아래와 같이 설명할 수 있습니다.
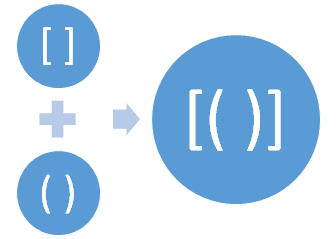
대괄호는 속성 바인딩을 나타내고, 작은 대괄호는 이벤트 바인딩을 나타내며, 둘 다의 조합은 양방향 데이터 바인딩을 나타냅니다. 양방향 데이터 바인딩의 구문은 상자 구문에서 banana라고도 합니다. 여기에서 데이터 바인딩에 대해 자세히 알아보세요.
이제 Angular의 다양한 유형의 바인딩에 대해 어느 정도 이해했습니다. Angular 구성 요소 간에 데이터가 어떻게 흐르는지 살펴보겠습니다. 데이터는 기본 형식, 배열, 개체 또는 이벤트일 수 있습니다. 구성 요소 간에 데이터를 흐르기 위해 Angular 다음을 제공합니다.
- @Input decorator
- @Output decorator
이 데코레이터는 모두 @angular/core의 일부입니다.
@Input() decorator marks a class field as an input property and supplies configuration metadata. It declares a data-bound input property, which Angular automatically updates during change detection.
데코레이터@Output 클래스 필드를 출력 속성으로 표시하고 구성 메타데이터를 제공합니다. 변경 감지 중에 자동으로 업데이트 Angular 데이터 바인딩된 출력 속성을 선언합니다.
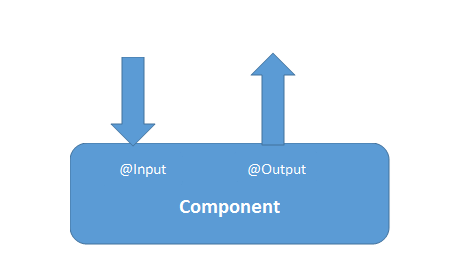
이 두 데코레이터는 구성 요소 간에 데이터를 흐르는 데 사용됩니다. 이 두 데코레이터 외에도 Angular 서비스를 사용하여 구성 요소 간에 데이터를 이동할 수도 있습니다. 컴포넌트에 데이터를 전달해야 하는 경우 데코레이터@Input 사용하고, 컴포넌트에서 데이터를 내보내야 하는 경우 데코레이터@Output 사용하십시오.
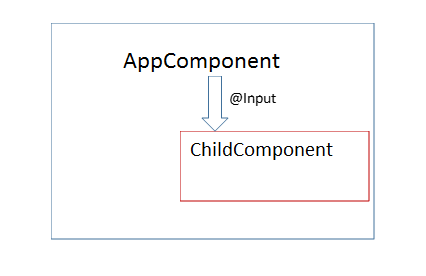
두 데코레이터 모두 서로 관련되어 있을 때 구성 요소 간에 작동합니다. 예를 들어 AppComponent라는 다른 구성 요소 내에서 ChildComponent라는 구성 요소를 사용하는 경우 서로 관련됩니다. 아래 이미지에서 이를 볼 수 있으며 데코레이터로 데코레이팅된 모든 ChildComponent 속성@Input AppComponent에서 데이터를 받을 수 있습니다.
더 잘 이해하려면 아래 나열된 ChildComponent를 고려하십시오.
import {
    Component,
    OnInit,
    Input
}

from '@angular/core';

@Component({
    selector: 'app-child',
    template: ` <p>count= {
            {
            count
        }
    }
    </p> `
}) export class ChildComponent implements OnInit {
    constructor() {}
    @Input() count: number;
    ngOnInit() {}
}
위의 코드 스니펫을 자세히 살펴보면 count 속성과 함께 @Input() 데코레이터를 사용하고 있는데, 이는 count 속성의 값이 ChildComponent 외부에서 설정된다는 것을 의미합니다. AppComponent 내에서 ChildComponent를 사용할 수 있으며 아래 목록과 같이 속성 바인딩을 사용하여 count 속성에 대한 값을 전달할 수 있습니다.
import { Component } from "@angular/core";

@Component({
  selector: "app-root",
  template: `<h2>{{ title }}</h2>

    <app-child [count]="count"></app-child> `,
})
export class AppComponent {
  count = 9;
}
AppComponent 내에서 ChildComponent를 사용하고 ChildComponent에서 데이터를 전달하는 속성 바인딩을 사용하고 있습니다. 현재 데이터는 단방향 흐름으로 ChildComponent에 전달되고 있습니다. 입력 바인딩 속성의 값이 업데이트될 때마다 Angular 변경 감지기가 실행됩니다. 그러나 @Input 데코레이터에서 변경 감지기가 실행되는 방식을 구성할 수 있습니다. 또한 데코레이터 속성@input 업데이트될 때마다 ngOnChanges() 라이프 사이클 후크를 실행 Angular ngOnChanges() 라이프 사이클 후크에서 입력 바인딩 속성의 업데이트된 값을 읽을 수 있습니다.
이제 부모 구성 요소에서 하위 구성 요소로 데이터를 전달하는 방법을 알았으므로 데이터 및 이벤트를 하위 구성 요소에서 부모 구성 요소로 내보내는 방법에 초점을 전환해 보겠습니다. 구성 요소에서 데이터와 이벤트를 내보내려면
- 장식가로 부동산@output 장식합니다. 이렇게 하면 이 속성은 아웃바운드 데이터 속성이 됩니다.
- EventEmitter 의 인스턴스를 만들고 @Output 데코레이터로 데코레이션합니다.
아래 이미지에서 데이터 또는 이벤트는 데코레이터를 사용하여 구성 요소 외부로 이동@Output 참고하십시오.
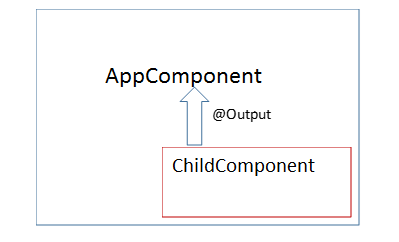
EventEmitter의 작동 방식을 자세히 설명하기 전에 아래 코드 예제를 검토하십시오. 아래 목록과 같이 버튼으로 ChildComponent를 수정합니다.
import {
    Component,
    OnInit,
    Input
}

from '@angular/core';

@Component({
    selector: 'app-child',
    template: ` <p>count= {
            {
            count
        }
    }

    </p> <button (click)='updateCount()' >update count </button> `

})
export class ChildComponent implements OnInit {

    constructor() {}
    @Input() count: number;
    ngOnInit() {}
    updateCount() {
        this.count=this.count+1;
    }

}
ChildComponent 에서 버튼을 클릭하면 카운트 값이 업데이트됩니다. 매우 간단합니다. 지금까지 클릭 이벤트는 ChildComponent 자체 내부에서 처리되었습니다.
이제 요구 사항을 약간 조정해 보겠습니다. ChildComponent 내부 버튼의 클릭 이벤트에서 AppComponent 의 함수를 실행하려면 어떻게해야합니까?
이렇게 하려면 ChildComponent 에서 버튼 클릭 이벤트를 내보내야 합니다. 이벤트 방출을 사용하면 ChildComponent 에서 데이터를 보낼 수도 있습니다. AppComponent에서 캡처할 데이터와 이벤트를 내보내도록 ChildComponent를 수정해 보겠습니다.
import {
    Component,
    OnInit,
    Input,
    Output,
    EventEmitter
}

from '@angular/core';

@Component({

    selector: 'app-child',

    template: ` <p>count= {
            {
            count
        }
    }
    </p><button (click)='updateCount()' >update count </button> `

})
export class ChildComponent implements OnInit {

    constructor() {}

    @Input() count: number;

    @Output() countChange=new EventEmitter();

    ngOnInit() {}

    updateCount() {

        this.count=this.count+1;

        this.countChange.emit(this.count);

    }

}
지금은 ChildComponent 에서 다음 작업을 수행하고 있습니다.
- countChange 라는 EventEmitter 인스턴스를 생성했으며, 버튼의 클릭 이벤트에서 부모 컴포넌트로 내보내집니다.
- updateCount()라는 함수를 만들었습니다. 이 함수는 단추의 클릭 이벤트에서 호출되며 함수 이벤트 내에서 countChange가 발생합니다.
- countChange 이벤트를 내보내는 동안 count 속성의 값도 구성 요소 외부로 전송됩니다.
계속 진행하기 전에 EventEmitter에 대해 알아보겠습니다. 지시문 및 구성 요소에서 사용자 지정 이벤트를 동기식 또는 비동기식으로 내보내는 데 사용됩니다. 모든 처리기는 EventEmitter 클래스의 인스턴스를 구독하여 이러한 이벤트를 처리할 수 있습니다. 핸들러가 이벤트를 구독할 수 있도록 RxJS 관찰 가능 항목을 사용하므로 일반 HTML 이벤트와 다릅니다.
EventEmitter 클래스의 구현을 살펴보면 Subject 클래스를 확장합니다.

EventEmitter 클래스는 RxJs Subject 클래스를 확장하므로 관찰 가능하고 많은 관찰자에게 멀티캐스트할 수 있습니다. DOM 이벤트와 동일하지 않습니다. 뮤티캐스트 및 관찰 할 수 없습니다.
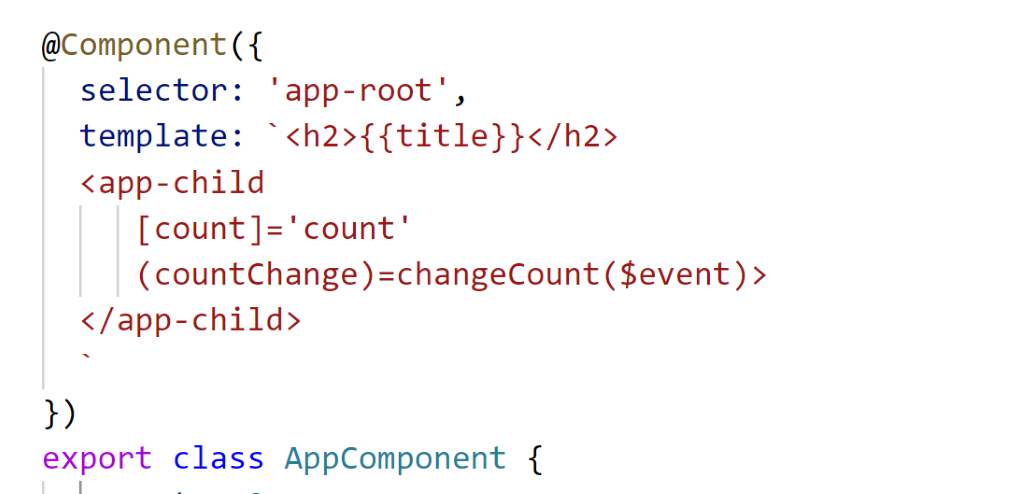
AppComponent에서 아래 코드 목록과 같이 ChildComponent에서 내보낸 이벤트를 처리할 수 있습니다.
import { Component } from '@angular/core';

@Component({
  selector: 'app-root',
  template: `<h2>{{title}}</h2>
  <app-child [count]='count' (countChange)=changeCount($event)></app-child>`
})

export class AppComponent {
   count = 9;
   changeCount(data) {
      console.log(data);
   }
}
현재 AppComponent 클래스에서 다음 작업을 수행하고 있습니다.
- 템플릿에서 <app-child>를 사용합니다.
- <app-child> 요소에서 이벤트 바인딩을 사용하여 countChange 이벤트를 사용합니다.
- countChange 이벤트에서 changeCount 함수를 호출합니다.
- changeCount 함수에서 ChildComponent에서 전달된 카운트 값을 인쇄합니다.
보시다시피 AppComponent의 함수는 ChildComponent에 배치된 버튼의 클릭 이벤트에서 호출됩니다. 이 작업은 @Output 및 EventEmitter를 사용하여 수행할 수 있습니다. 현재 데이터는 @Input() 및 @Output() 데코레이터를 사용하여 구성 요소 간에 흐르고 있습니다.

보시다시피 두 구성 요소 간에 양방향 데이터 바인딩을 만들었습니다. 코드를 보면 속성 바인딩과 이벤트 바인딩의 조합입니다.
실시간 예제
@Output와 EventEmitter가 어떻게 더 유용한지 알아보기 위해 실시간 예제를 살펴보겠습니다. AppComponent가 아래 이미지와 같이 제품 목록을 표 형식으로 렌더링하고 있다고 가정합니다.

위의 제품 테이블을 만들기 위해 제품 목록을 반환하는 함수가 하나만 있는 매우 간단한 AppComponent 클래스가 있습니다.
export class AppComponent implements OnInit {
  products = [];
  title = 'Products';
  ngOnInit() {
    this.products = this.getProducts();
  }

  getProducts() {
    return [
      { 'id': '1', 'title': 'Screw Driver', 'price': 400, 'stock': 11 },
      { 'id': '2', 'title': 'Nut Volt', 'price': 200, 'stock': 5 },
      { 'id': '3', 'title': 'Resistor', 'price': 78, 'stock': 45 },
      { 'id': '4', 'title': 'Tractor', 'price': 20000, 'stock': 1 },
      { 'id': '5', 'title': 'Roller', 'price': 62, 'stock': 15 },
    ];
  }
}
ngOnInit 라이프 사이클 후크에서는 getPrdoducts() 함수를 호출하고 반환된 데이터를 products 변수에 할당하여 템플릿에서 사용할 수 있도록 합니다. 거기에서 우리는 *ngFor 지시문을 사용하여 배열을 반복하고 제품을 표시합니다. 아래 코드를 참조하십시오.
<div class="container">
  <br/>
  <h1 class="text-center">{{title}}</h1>
  <table class="table">
    <thead>
      <th>Id</th>
      <th>Title</th>
      <th>Price</th>
      <th>Stock</th>
    </thead>
    <tbody>
      <tr *ngFor="let p of products">
        <td>{{p.id}}</td>
        <td>{{p.title}}</td>
        <td>{{p.price}}</td>
        <td>{{p.stock}}</td>
      </tr>
    </tbody>
  </table>
</div>
이 코드를 사용하면 제품이 아래 이미지와 같이 테이블로 렌더링됩니다.

이제 아래 이미지와 같이 버튼과 입력 상자가 있는 새 열을 추가한다고 가정해 보겠습니다.

우리의 요구 사항은 다음과 같습니다.
- 주식 값이 10보다 크면 버튼 색상은 녹색이어야 합니다.
- 재고 값이 10 미만이면 버튼 색상은 빨간색이어야 합니다.
- 사용자는 입력 상자에 숫자를 입력할 수 있으며, 이 숫자는 특정 주식 가치에 추가됩니다.
- 버튼의 색상은 제품 재고의 변경된 가치에 따라 업데이트되어야 합니다.
이 작업을 수행하기 위해 StockStausComponent 라는 새 자식 구성 요소를 만들어 보겠습니다. 기본적으로 StockStatusComponent의 템플릿에는 하나의 버튼과 하나의 숫자 입력 상자가 있습니다. StockStatusComponent에서 :
- AppComponnet에서 전달된 주식의 가치를 읽어야 합니다. 이를 위해서는 다음을 사용해야 합니다@Input
- StockStatusComponent 단추를 클릭할 때 AppComponent의 함수를 호출할 수 있도록 이벤트를 내보내야 합니다. 이를 위해서는 @Output 및 EventEmitter를 사용해야 합니다.
Consider the code below:
stockstatus.component.ts
import { Component, Input, EventEmitter, Output, OnChanges } from '@angular/core';

@Component({
    selector: 'app-stock-status',
    template: `<input type='number' [(ngModel)]='updatedstockvalue'/> <button class='btn btn-primary'
     [style.background]='color'
     (click)="stockValueChanged()">Change Stock Value</button> `
})

export class StockStatusComponent implements OnChanges {
    @Input() stock: number;
    @Input() productId: number;
    @Output() stockValueChange = new EventEmitter();
    color = '';
    updatedstockvalue: number;

    stockValueChanged() {
        this.stockValueChange.emit({ id: this.productId, updatdstockvalue: this.updatedstockvalue });
        this.updatedstockvalue = null;
    }

    ngOnChanges() {
        if (this.stock > 10) {
            this.color = 'green';
        } else {
            this.color = 'red';
        }
    }
}
위의 수업을 한 줄씩 살펴보겠습니다.
- 첫 번째 줄에서는 @Input, @Output 등 필요한 모든 것을 가져옵니다.
- 템플릿에는 바인딩된 하나의 숫자 입력 상자가 있습니다. 업데이트된 재고 가치 속성을 사용하여 [(ng모델)]. 이벤트와 함께 이 값을 AppComponent.
- 템플릿에는 하나의 버튼이 있습니다. 단추의 클릭 이벤트에서 이벤트가 AppComponent로 내보내집니다.
- 제품 재고 가치를 기준으로 버튼의 색상을 설정해야 합니다. 따라서 속성 바인딩을 사용하여 버튼의 배경을 설정해야 합니다. color 속성의 값이 클래스에서 업데이트됩니다.
- 두 개의 @Input() 데코레이션 속성(stock 및 productId)을 만들고 있는데, 이 두 속성의 값이 AppComponent에서 전달되기 때문입니다.
- stockValueChange 라는 이벤트를 만들고 있습니다. 이 이벤트는 단추를 클릭할 때 AppComponent로 내보냅니다.
- stockValueChanged 함수에서 stockValueChange 이벤트를 내보내고 업데이트할 제품 ID와 제품 재고 값에 추가할 값을 전달합니다.
- AppComponent에서 스톡 값이 업데이트될 때마다 color 속성의 값을 업데이트해야 하기 때문에 ngOnChanges() 라이프 사이클 후크에서 color 속성 값을 업데이트하고 있습니다.
여기서는 @Input 데코레이터를 사용하여 AppComponent 클래스에서 데이터를 읽고 있으며, 이 경우 상위 클래스입니다. 부모 구성 요소 클래스에서 자식 구성 요소 클래스로 데이터를 전달하려면 @Input 데코레이터를 사용합니다.
또한 EventEmitter와 함께 @Output 사용하여 AppComponent에 이벤트를 내보냅니다. 따라서 자식 구성 요소 클래스에서 부모 구성 요소 클래스로 이벤트를 내보내려면 @Output() 데코레이터와 함께 EventEmitter를 사용합니다.
따라서 StockStatusComponent는 @Input와 @Output를 모두 사용하여 AppComponent에서 데이터를 읽고 AppComponent에 이벤트를 내보냅니다.
Modify AppComponent to use StockStatusComponent
먼저 템플릿을 수정해 보겠습니다. 템플릿에서 새 테이블 열을 추가합니다. 열 내부에는 <app-stock-status> 구성 요소가 사용됩니다.
<div class="container">
  <br/>
  <h1 class="text-center">{{title}}</h1>
  <table class="table">
    <thead>
      <th>Id</th>
      <th>Title</th>
      <th>Price</th>
      <th>Stock</th>
    </thead>
    <tbody>
      <tr *ngFor="let p of products">
        <td>{{p.id}}</td>
        <td>{{p.title}}</td>
        <td>{{p.price}}</td>
        <td>{{p.stock}}</td>
        <td><app-stock-status [productId]='p.id' [stock]='p.stock' (stockValueChange)='changeStockValue($event)'></app-stock-status></td>
      </tr>
    </tbody>
  </table>
</div>
속성 바인딩(이 두 속성은 StockStatusComponent에서 @Input()로 데코레이팅됨)을 사용하고 이벤트 바인딩을 사용하여 stockValueChange 이벤트를 처리합니다(이 이벤트는 StockStatusComponent에서 @Output()로 데코레이팅됨)을 사용하여 productId 및 stock에 값을 전달합니다.
다음으로 AppComponent에 changeStockValue 함수를 추가해야 합니다. AppComponent 클래스에 다음 코드를 추가합니다.
productToUpdate: any;

changeStockValue(p) {
    this.productToUpdate = this.products.find(this.findProducts, [p.id]);
    this.productToUpdate.stock = this.productToUpdate.stock + p.updatdstockvalue;
  }

  findProducts(p) {
    return p.id === this[0];
  }
이 함수에서는 JavaScript Array.prototype.find 메서드를 사용하여 일치하는 productId가 있는 제품을 찾은 다음 일치하는 제품의 재고 수를 업데이트합니다. 애플리케이션을 실행하면 다음과 같은 출력이 표시됩니다.
숫자 상자에 숫자를 입력하고 단추를 클릭하면 하위 구성 요소에서 부모 구성 요소의 작업 값을 업데이트하는 작업을 수행합니다. 또한 상위 구성 요소 값을 기반으로 하위 구성 요소에서 스타일이 변경되고 있습니다. 이 모든 것은 Angular @Input, @Output 및 EventEmitter를 사용하여 가능합니다.
Angular의 다른 기능에 대해 더 자세히 설명하는 향후 기사를 계속 지켜봐 주시기 바랍니다!
