계층적 그리드 로드 온디맨드
이 Ignite UI for AngularIgxHierarchicalGrid은 서버에서 최소한의 데이터를 요청하여 사용자가 결과를 보고 가능한 한 빠르게 시각화 데이터를 조작할 수 있도록 빠른 렌더링을 가능하게 합니다. 처음에는 루트 그리드의 데이터만 검색되어 렌더링되며, 사용자가 자식 그리드가 포함된 행을 확장한 후에야 해당 자식 그리드의 데이터를 받게 됩니다. 이 메커니즘은 Load on Demand라고도 하며, 원격 데이터와 쉽게 작동하도록 구성할 수 있습니다.
이 항목에서는 Northwind WebAPI에서 데이터를 요청하여 요청 시 로드를 구성하는 방법을 보여 줍니다. 다음은 작업 데모이며 나중에 단계별로 살펴보고 만드는 과정을 설명합니다.
Angular Hierarchical Grid Load On Demand Example
Hierarchical Grid Setup
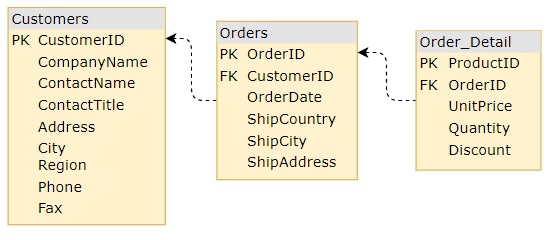
계층 그리드를 설정해 봅시다. 먼저 우리가 기대하는 계층 구조 수준을 포함한 계층적 격자 템플릿을 정의할 것입니다. 우리는 고객의 루트 그리드primaryKey가 그들의 주문에 대해 1단계customerId-그리고 주문 세부 정보에orderId 대해 -를 가지고 있다는productId 것을 알고 있습니다. 각 데이터베이스 테이블과 그 키를 알면 초기 템플릿을 정의할 수 있습니다:
<igx-hierarchical-grid #hGrid [primaryKey]="'customerId'" [autoGenerate]="true" [height]="'600px'" [width]="'100%'">
    <igx-row-island [key]="'Orders'" [primaryKey]="'orderId'" [autoGenerate]="true">
        <igx-row-island [key]="'Details'" [primaryKey]="'productId'" [autoGenerate]="true">
        </igx-row-island>
    </igx-row-island>
</igx-hierarchical-grid>
나중에 코드에서 엔드포인트에서 루트 그리드의 데이터를 얻은 후, 참조를#hGrid 사용할 수 있기 때문에 쉽게 그 데이터를 설정할 수 있습니다. 확장된 자녀의 데이터를 설정하는 것은 조금 다릅니다.
행이 처음 확장되면 새로운 자식IgxHierarchicalGrid이 렌더링되고, 새로 생성된 그리드의 참조를 받아 데이터를 설정해야 합니다. 그래서 각IgxRowIsland 컴포넌트는 해당 행 섬에 대해 새로운 자식 그리드가 생성될 때 발생하는 이벤트를 제공합니다gridCreated. 이를 이용해 새 그리드에 필요한 참조를 얻고, 엔드포인트에 데이터를 요청한 후 적용할 수 있습니다.
엔드포인트에는 행 아일랜드의 키, 부모 행의 기본 키 및 고유 식별자만 필요하기 때문에 모든 행 아일랜드에 대해 하나의 방법을 사용할 수 있습니다. 이 모든 정보는 이벤트 인수에서 직접 액세스할 수 있습니다.
로딩 표시 설정
이제 사용자가 데이터가 계속 로드 중임을 알려 빈 그리드를 볼 필요가 없도록 하여 사용자 경험을 개선해 봅시다. 그래서IgxHierarchicalGrid 그리드가 비어 있을 때도 표시할 수 있는 로딩 표시기를 지원합니다.
데이터를 없을 때 속성을 설정isLoadingtrue 하여 로딩 표시기를 표시합니다. 루트 그리드에 대해 처음에 설정해야 하고, 새 자식 그리드를 생성할 때도 데이터가 로드될 때까지 설정해야 합니다. 템플릿에서 를 설정할true 수도 있지만, 서비스가 빈 배열을 반환할 경우 그리드에 데이터가 없다는 것을 보여주고 싶습니다(설정false으로)
마지막으로, 속성을 끄autoGenerate 고 마크업에서 열 컬렉션을 정의해 봅시다.
모든 변경 사항이 추가된 후 템플릿 파일은hierarchical-grid-lod.component.html 다음과 같습니다:
    <igx-hierarchical-grid #hGrid [data]="remoteData" [isLoading]="true" [primaryKey]="'customerId'" [autoGenerate]="false" [height]="'580px'" [width]="'100%'" [igxPreventDocumentScroll]="true" [allowAdvancedFiltering]="true" [schema]="schema" (advancedFilteringExpressionsTreeChange)="refreshRootGridData()">
            <igx-grid-toolbar></igx-grid-toolbar>

            <igx-column field="customerId" [dataType]="'string'"></igx-column>
            <igx-column field="companyName" [dataType]="'string'"></igx-column>
            <igx-column field="contactName" [dataType]="'string'"></igx-column>
            <igx-column field="contactTitle" [dataType]="'string'"></igx-column>

        <igx-row-island #rowIsland1 [key]="'Orders'" [primaryKey]="'orderId'" [autoGenerate]="false" (gridCreated)="gridCreated($event)">
            <igx-column field="orderId"></igx-column>
            <igx-column field="customerId"></igx-column>
            <igx-column field="shipVia"></igx-column>
            <igx-column field="freight"></igx-column>

            <igx-row-island #rowIsland2 [key]="'Details'" [primaryKey]="'orderId'" [autoGenerate]="false" (gridCreated)="gridCreated($event)">
                <igx-column field="orderId"></igx-column>
                <igx-column field="productId"></igx-column>
                <igx-column field="unitPrice"></igx-column>
                <igx-column field="quantity"></igx-column>
                <igx-column field="discount"></igx-column>
            </igx-row-island>
        </igx-row-island>
    </igx-hierarchical-grid>
Advanced filtering
로드 온 디맨드에서IgxHierarchicalGrid 고급 필터링을 사용하려면 그리드의 속성을 계층 구조를 가진 엔티티로 설정schema 하고, 자식 엔티티와 필드를 데이터 타입으로 지정해야 합니다. 이로 인해 중첩된 쿼리가 포함된 필터링식이 자식 그리드 데이터가 로드되기 전부터 생성될 수 있고, 그리드가 이 필터들을 올바르게 해석하고 적용할 수 있습니다.
우리의 경우 올바른 계층 구조는 다음과 같습니다.
public schema: EntityType[] = [
    {
        name: 'Customers',
        fields: [
            { field: 'customerId', dataType: 'string' },
            { field: 'companyName', dataType: 'string' },
            { field: 'contactName', dataType: 'string' },
            { field: 'contactTitle', dataType: 'string' }
        ],
        childEntities: [
            {
                name: 'Orders',
                fields: [
                    { field: 'customerId', dataType: 'string' },
                    { field: 'orderId', dataType: 'number' },
                    { field: 'employeeId', dataType: 'number' },
                    { field: 'shipVia', dataType: 'string' },
                    { field: 'freight', dataType: 'number' }
                ],
                childEntities: [
                    {
                        name: 'Details',
                        fields: [
                            { field: 'orderId', dataType: 'number' },
                            { field: 'productId', dataType: 'number' },
                            { field: 'unitPrice', dataType: 'number' },
                            { field: 'quantity', dataType: 'number' },
                            { field: 'discount', dataType: 'number' }
                        ]
                    }
                ]
            }
        ]
    }
];
초기 필터 설정
이제 그리드에 초기 필터링 규칙을 추가하여 루트 그리드가 처음 로드될 때 필터링되도록 하겠습니다. 우리는FilteringExpressionsTree 그리고 그것을advancedFilteringExpressionsTreeIgxHierarchicalGridngOnInit 라이프사이클 훅.
예를 들어, 최소500 한 주문 화물을 가진 고객을 필터링하고 싶다고 가정해 봅시다. 필터링 표현식에서 중첩 쿼리를 생성할 수 있는 기능을 활용할 것이며, 그 결과는 다음과 같습니다:
public ngOnInit() {
    const ordersTree = new FilteringExpressionsTree(FilteringLogic.And, undefined, 'Orders', ['customerId']);
    ordersTree.filteringOperands.push({
        fieldName: 'freight',
        ignoreCase: false,
        condition: IgxNumberFilteringOperand.instance().condition('greaterThanOrEqualTo'),
        conditionName: IgxNumberFilteringOperand.instance().condition('greaterThanOrEqualTo').name,
        searchVal: '500'
    });

    const customersTree = new FilteringExpressionsTree(FilteringLogic.And, undefined, 'Customers', ['customerId', 'companyName', 'contactName', 'contactTitle']);
    customersTree.filteringOperands.push({
        fieldName: 'customerId',
        condition: IgxStringFilteringOperand.instance().condition('inQuery'),
        conditionName: IgxStringFilteringOperand.instance().condition('inQuery').name,
        ignoreCase: false,
        searchTree: ordersTree
    });
    this.hGrid.advancedFilteringExpressionsTree = customersTree;
}
Connecting to the endpoint
우리는 브라우저가 제공하는 XMLHttpRequest 인터페이스를 사용하여 HTTP 프로토콜을 통해 엔드포인트와 통신할 예정입니다. 이를 더 쉽게 달성하기 위해 간소화된 클라이언트 HTTP API를 제공하는 Angular 모듈HttpClient을 사용할 예정입니다.
루트 그리드 데이터 가져오기
Northwind WebAPI는 매개변수로 받IFilteringExpressionsTree 아주는 POST 엔드포인트를 제공하며, 우리는 이를 이용해 루트 그리드의 고급 필터링 기능과IgxHierarchicalGrid 필터 레코드를 활용할 것입니다. 우리는 다음과 같은refreshRootGridData 방법으로 진행할 것입니다:
public refreshRootGridData() {
    const tree = this.hGrid.advancedFilteringExpressionsTree;
    this.hGrid.isLoading = true;
    if (tree) {
        this.http.post(`${API_ENDPOINT}/QueryBuilder/ExecuteQuery`, tree).subscribe(data =>{
            this.remoteData = Object.values(data)[0];
            this.hGrid.isLoading = false;
            this.hGrid.cdr.detectChanges();
        });
    } else {
        this.http.get(`${API_ENDPOINT}/Customers`).subscribe(data => {
            this.remoteData = Object.values(data);
            this.hGrid.isLoading = false;
            this.hGrid.cdr.detectChanges();
        });
    }
}
보this.http 시다시피 우리HttpCLient 모듈에 대한 참고 자료가 될 것입니다. 이 메서드는subscribe Angular의 Observable의 일부이며 HTTP 요청의 비동기 응답을 처리하는 데 사용됩니다. 데이터가 수신되면, 해당 그리드에 가져온 데이터를 할당하고, 로딩 상태를 false로 업데이트하며, UI가 변경 사항을 반영하도록 변경 감지를 트리거합니다.
루트 그리드가 처음 렌더링된 후 데이터를 로드하기 위해 라이프사이클 훅을ngAfterViewInit 사용하고 메서드를refreshRootGridData 호출합니다:
public ngAfterViewInit() {
    this.refreshRootGridData();
}
자식 그리드 데이터 가져오기
다음으로 하위 그리드에 대한 데이터를 가져오기 위해 GET 요청에 대한 URL을 빌드하는 방법을 정의합니다. 다음은 테이블 간의 관계를 시각적으로 표현한 것입니다.
마지막으로, 새로 생성된 자식 그리드에 대해 데이터를 요청하는 메서드를 구현gridCreated 해야 합니다. 루트 레벨 그리드 데이터를 얻는 것과 비슷하지만, 이번에는 이벤트gridCreated에서 제공된 데이터를 사용해 URL을 구축할 것입니다:
public gridCreated(event: IGridCreatedEventArgs) {
    event.grid.isLoading = true;
    const url = this.buildUrl(event);
    this.http.get(url).subscribe(data => {
        event.grid.data = Object.values(data);
        event.grid.isLoading = false;
        this.hGrid.cdr.detectChanges();
    });
}

private buildUrl(event: IGridCreatedEventArgs) {
    const parentKey = (event.grid.parent as any).key ?? this.schema[0].name;
    const url = `${API_ENDPOINT}/${parentKey}/${event.parentID}/${event.owner.key}`;
    return url;
}
API References
Additional Resources
우리 커뮤니티는 활동적이며 항상 새로운 아이디어를 환영합니다. GitHub