Ignite UI for React와 Next.js 통합
Ignite UI for React이 Next.js 프로젝트에 원활하게 통합되는 방법을 살펴보세요. 이 항목은 개발자가 Infragistics React 구성 요소를 최대한 활용하면서 Next.js의 기능을 활용하여 강력하고 성능이 뛰어난 풀 스택 애플리케이션을 빌드할 수 있도록 돕기 위해 작성되었습니다.
Prerequisites
- NodeJS를 설치합니다.
- 비주얼 스튜디오 코드를 설치합니다.
Creating New Next.js Project
위의 필수 구성 요소가 설치되면 새 Next.js 응용 프로그램을 만들 수 있습니다.
1 -VS Code를 열고 터미널 메뉴를 선택한 다음 새 터미널 옵션을 선택합니다.
2 - 터미널 창에 다음 명령을 입력합니다.
npx create-next-app@latest MyAppName
cd MyAppName
Updating Existing Next.js App
기존 Next.js 프로젝트(이전에 가지고 있는 프로젝트)에서 Ignite UI for React 사용하려는 경우. 우리는 당신을 덮었습니다! 다음 명령을 실행하기만 하면 됩니다.
npm install --save igniteui-react
npm install --save igniteui-react-charts igniteui-react-core
npm install --save igniteui-react-excel igniteui-react-core
npm install --save igniteui-react-gauges igniteui-react-core
npm install --save igniteui-react-grids igniteui-react-core
npm install --save igniteui-react-maps igniteui-react-core
npm install --save igniteui-react-spreadsheet igniteui-react-core
또는
yarn add igniteui-react-charts igniteui-react-core
yarn add igniteui-react-excel igniteui-react-core
yarn add igniteui-react-gauges igniteui-react-core
yarn add igniteui-react-grids igniteui-react-core
yarn add igniteui-react-maps igniteui-react-core
yarn add igniteui-react-spreadsheet igniteui-react-core
이렇게 하면 기존 프로젝트에 대한 Ignite UI for React 패키지와 모든 종속성, 글꼴 가져오기 및 스타일 참조가 자동으로 설치됩니다.
Importing Component Modules
먼저 사용하려는 구성 요소의 필수 모듈을 가져와야 합니다. 계속해서 GeographicMap 구성 요소에 대해 이 작업을 수행하겠습니다.
"use client"
import { IgrGeographicMapModule, IgrGeographicMap } from 'igniteui-react-maps';
import { IgrDataChartInteractivityModule } from 'igniteui-react-charts';

IgrGeographicMapModule.register();
IgrDataChartInteractivityModule.register();
[!Note] It's important to note that Ignite UI for React components are using client-only features like state and browser events. Infragistics' components will work as expected within Client Next.js Components since they have the "use client" directive, but they won't work within Server Components.
Using Components
이제 Next.js 구성 요소에서 Ignite UI for React 맵 구성 요소를 사용할 준비가 되었습니다! 계속해서 정의해 보겠습니다.
function App() {
  return (
    <div style={{ height: "100%", width: "100%" }}>
      <IgrGeographicMap
        width="800px"
        height="500px"
        zoomable="true" />
    </div>
  );
}
Running Application
마지막으로 다음 명령 중 하나를 사용하여 새 애플리케이션을 실행할 수 있습니다.
npm run dev
이 명령을 실행하면 프로젝트가 빌드되어 컴퓨터에서 로컬로 제공됩니다. 기본 브라우저에서 자동으로 열리고 프로젝트에서 Ignite UI for React 사용할 수 있습니다.
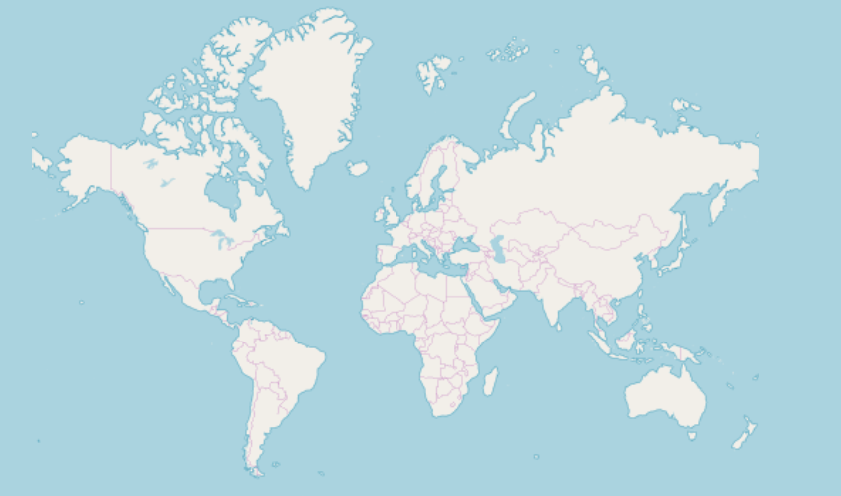
최종 결과는 다음 스크린샷과 같아야 합니다.

Using React in Next.js Server Components
앞서 언급했듯이 React의 대부분 구성 요소는 상태 및 브라우저 이벤트에 의존하므로 서버 구성 요소 내에서 직접 사용하는 것과 호환되지 않습니다. 그럼에도 불구하고 이런 방식으로 사용해야 할 필요가 있다면 Infragistics의 구성 요소를 해당 클라이언트 구성 요소 내에 래핑할 수 있습니다.
'use client'
import { IgrGeographicMap } from 'igniteui-react-maps';
IgrGeographicMapModule.register();

export default IgrGeographicMap;
그런 다음 Next.js 서버 구성 요소에서 IgrGeographicMap을 직접 사용할 수 있습니다.
import IgrGeographicMap from './wrapped-geographic-map';

function App() {
  return (
    <div style={{ height: "100%", width: "100%" }}>
      <IgrGeographicMap
        width="800px"
        height="500px"
        zoomable="true" />
    </div>
  );
}
[!Note] The majority of Ignite UI for React components may remain unwrapped as they are expected to be utilized within other Client Components. Therefore, there is no need to wrap all Infragistics' components.
Dynamic import of Ignite UI for React components
레이지 로딩은 경로를 렌더링하는 데 필요한 자바스크립트 양을 줄여주는 레이지 로딩으로 애플리케이션의 초기 로딩 성능을 향상시킵니다. 이 기능은 가져오기 라이브러리의 불러오기를 미루고 필요할 때만 클라이언트 번들에 포함시킬 수 있게 해줍니다. 이 기능을 사용하면next/dynamic 레이지 로딩을 구현할 수 있습니다:
"use client";
import "igniteui-webcomponents/themes/light/bootstrap.css";
import dynamic from "next/dynamic";

export default function DynamicButtonComponent() {
  const IgButton = dynamic(
    async () => {
      const { IgrButton, IgrButtonModule } = await import("igniteui-react");
      IgrButtonModule.register();
      return IgrButton;
    }
  );

  return (
      <IgButton variant="contained">
        <span key="title">Click me</span>
      </IgButton>
  );
}
그러나 일반적으로 자식 구성 요소를 포함하는 IgrGrid와 같이 더 복잡한 구성 요소를 사용하는 경우 각 자식 구성 요소를 동적으로 가져오지 않는 것이 중요합니다. 구성 요소는 다음과 같이 사용해야 합니다.
"use client";
import dynamic from "next/dynamic";
import CustomersDataLocal from "./CustomersDataLocal.json";
import "igniteui-react-grids/grids/combined";
import "igniteui-react-grids/grids/themes/light/bootstrap.css";

export default function GridDynamicComponent() {
  const IgnGrid = dynamic(
    async () => {
      const {
        IgrGrid,
        IgrGridModule,
        IgrColumn,
        IgrGridToolbar,
        IgrGridToolbarTitle,
        IgrGridToolbarActions,
        IgrGridToolbarPinning,
      } = await import("igniteui-react-grids");
      IgrGridModule.register();

      const IgGrid = ({ ...props }) => {
        return (
          <IgrGrid {...props}>
            <IgrGridToolbar>
              <IgrGridToolbarTitle></IgrGridToolbarTitle>
              <IgrGridToolbarActions>
                <IgrGridToolbarPinning></IgrGridToolbarPinning>
              </IgrGridToolbarActions>
            </IgrGridToolbar>
            <IgrColumn field="ID" header="ID" hidden="true"></IgrColumn>
            <IgrColumn
              field="CompanyName"
              header="Company Name"
              width="300px"
            ></IgrColumn>
            <IgrColumn
              field="ContactName"
              header="Contact Name"
              width="200px"
              pinned="true"
            ></IgrColumn>
            <IgrColumn
              field="ContactTitle"
              header="Contact Title"
              width="200px"
              pinned="true"
            ></IgrColumn>
            <IgrColumn
              field="Address"
              header="Address"
              width="300px"
            ></IgrColumn>
            <IgrColumn field="City" header="City" width="120px"></IgrColumn>
            <IgrColumn field="Region" header="Region" width="120px"></IgrColumn>
            <IgrColumn
              field="PostalCode"
              header="Postal Code"
              width="150px"
            ></IgrColumn>
            <IgrColumn field="Phone" header="Phone" width="150px"></IgrColumn>
            <IgrColumn field="Fax" header="Fax" width="150px"></IgrColumn>
          </IgrGrid>
        );
      };
      return IgGrid;
    }
  );

  return <IgnGrid data={CustomersDataLocal}></IgnGrid>;
}
[!Note] Implementing lazy loading for components can enhance performance, but it is advisable to use it exclusively when the components are not immediately visible on the page.
Limitations
- Next.js 프로젝트가 페이지 라우팅을 사용한다면, 옵션을 사용해
next.config.jsIgnite UI for React 패키지를 트랜스파일해야 합니다. 설정에는 다음 내용이 포함되어야 합니다:
const nextConfig = {
    transpilePackages: ['igniteui-react'],
    experimental: {
        esmExternals: "loose",
    }
}
Additional Resources
우리 커뮤니티는 활동적이며 항상 새로운 아이디어를 환영합니다.

